
After spending a long time of my life using the normal terminal I met a new tool called iTerm2 because a friend of mine a few years ago. And, this week I’ve discovered the power of zplug. So, here’s a brief tutorial on how to get something looking similar to this:
iTerm2
This is a tool like the native app for terminal provided by Apple that has a lot of features that you can just check here. It allows you to customize everything from autocomplete to syntax highlight.
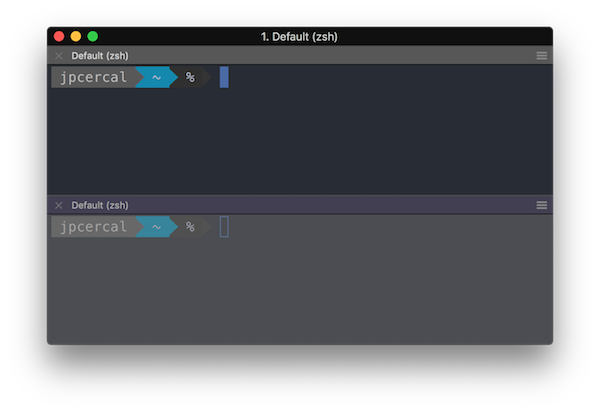
But the most interesting feature for me is called Split Panes.
Cmd ⌘ + D split pane vertically
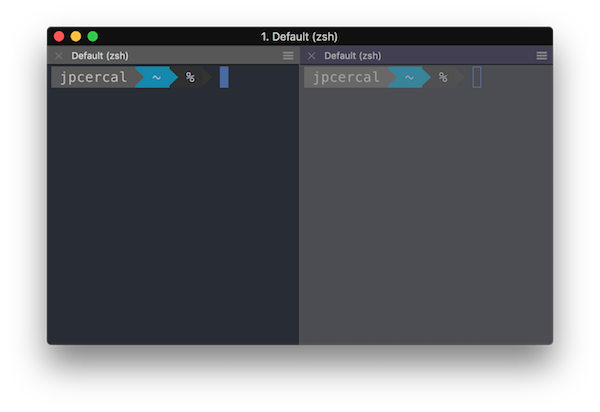
Cmd ⌘ + Shift + D split pane horizontally
Colors scheme
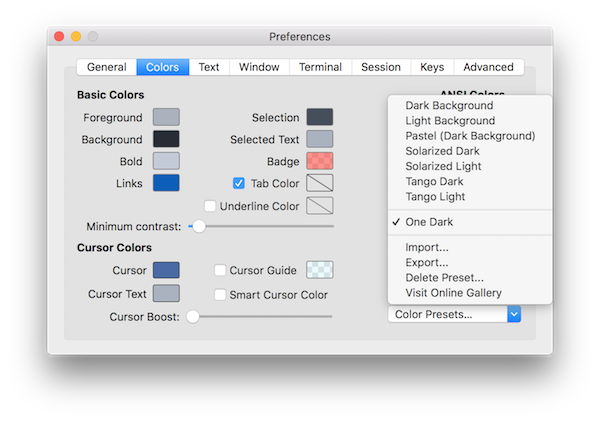
To continue with the customization of your terminal we’ll install the One Dark color scheme in your iTerm app.
| git clone -b master --depth=1 https://github.com/bahlo/iterm-colors.git ~/iterm-colors
|
This command will download some presets including One Dark theme. In order to install it on iTerm press Cmd ⌘ + I and go to Colors > Color Presets > Import..., there you can select the preset that you would like to import.
Note that the presets are living inside of the directory ~/iterm-colors/colors/*.itermcolors.
Meslo Font
Another thing to install is a good font, I’m using Meslo if you want the same you can install doing this:
| git clone https://github.com/powerline/fonts.git && cd fonts && ./install.sh
|
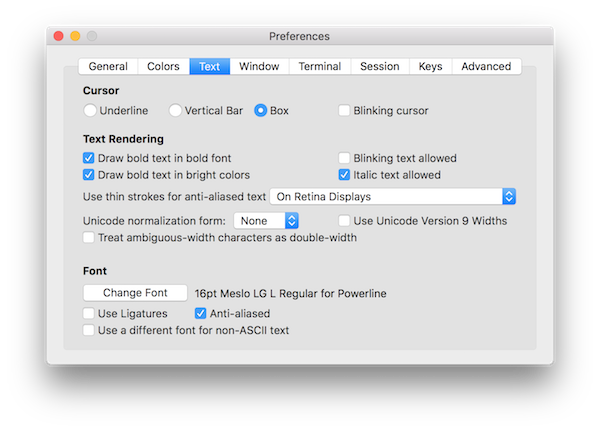
And, to use this font on iTerm press Cmd ⌘ + I and to go Text > Change Font > Family > Meslo LG L for Powerline. Don’t forget to disable the option Use a different font for non-ASCII text.
Zplug
It’s a Zsh Plugin Manager like oh-my-zsh, prezto and antigen.
Some advantages according to the project page:
- Can manage everything
- Zsh plugins/UNIX commands on GitHub and Bitbucket
- Gist files (gist.github.com)
- Externally managed plugins e.g., oh-my-zsh and prezto plugins/themes
- Binary artifacts on GitHub Releases
- Local plugins
- etc. (you can add your own sources!)
- Super-fast parallel installation/update
- Support for lazy-loading
- Branch/tag/commit support
- Post-update, post-load hooks
- Dependencies between packages
- Unlike antigen, no ZSH plugin file (*.plugin.zsh) required
- Interactive interface (fzf, peco, zaw, and so on)
- Cache mechanism for reducing the startup time
This is a framework for managing your zsh configuration. In order to install this tool, you should run this command:
| brew install zplug
|
My configuration file ~/.zshrc
This is the configuration file that I’m using now. To be able to use this one you must install this dependencies before proceed:
| pip install psutil
pip install powerline-shell
brew install peco
|
Now, copy and paste this content to your ~/.zshrc file.
| ###########################################################
# Pre configuration
# Define the environment variable ZPLUG_HOME
export ZPLUG_HOME=/usr/local/opt/zplug
# Loads zplug
source $ZPLUG_HOME/init.zsh
# Clear packages
zplug clear
###########################################################
# Packages
zplug "zsh-users/zsh-syntax-highlighting"
zplug "zsh-users/zsh-autosuggestions"
zplug "zsh-users/zsh-completions"
zplug "paulmelnikow/zsh-startup-timer"
zplug "tysonwolker/iterm-tab-colors"
zplug "desyncr/auto-ls"
zplug "momo-lab/zsh-abbrev-alias"
zplug "rawkode/zsh-docker-run"
zplug "arzzen/calc.plugin.zsh"
zplug "peterhurford/up.zsh"
zplug "jimeh/zsh-peco-history"
###########################################################
# Theme
zplug "b-ryan/powerline-shell"
function powerline_precmd() {
PS1="$(powerline-shell --shell zsh $?)"
}
function install_powerline_precmd() {
for s in ${precmd_functions[@]}; do
if [ "$s" = "powerline_precmd" ]; then
return
fi
done
precmd_functions+=(powerline_precmd)
}
if [ "$TERM" != "linux" ]; then
install_powerline_precmd
fi
###########################################################
# Install packages that have not been installed yet
if ! zplug check --verbose; then
printf "Install? [y/N]: "
if read -q; then
echo; zplug install
else
echo
fi
fi
zplug load
###########################################################
# Post configuration
# Aliases
abbrev-alias -g G="| grep"
# Docker images
function npm() {
run_with_docker "node" "alpine" "npm" $@
}
function go() {
run_with_docker "golang" "latest" "go" $@
}
function php() {
run_with_docker "php" "latest" "php" $@
}
|
This file will be loaded each time that you start a new session using your terminal, so during the next session you should see a question there because you don’t have the plugins yet Install? [y/N]:, after the installation you should be able to have a terminal like I have here.
Let me know if you have questions about this process.
Note that the focus of this tutorial was to have it working on OSX but I’m pretty sure that’s possible to have the same environment running on Linux or Windows but without iTerm since this app is just available for OSX.